This guide will look at using e-DRS to electronically submit applications to the Land Registry.
What is e-DRS
e-DRS is the HM Land Registry electronic document registration service (e-DRS), which allows users to submit applications to change the register electronically. This provides users with:
- a faster and more accurate service
- lower postal costs
- lower fees for some services
- a reduced environmental impact
- an electronic audit trail to help prevent fraud
Please note: In order to use this service you must have your Land Registry account linked up to your Hoowla account. See this guide on how to do this – Link up your land registry account to Hoowla.
How to submit to the Land Registry using e-DRS
Sending a property registration electronically to the Land Registry is done in two main stages:
- preparing and sending your submission to the Land Registry
- uploading all your supporting documents
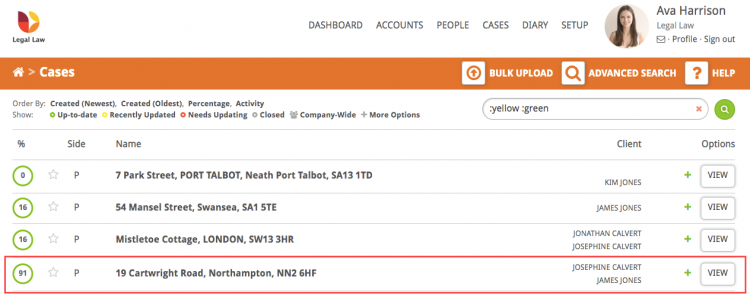
Firstly let’s access the case of the property we want to submit to the Land Registry.
Click the Cases link next to your name.

Select the case you wish to make the submission on by clicking on the case address or View button.
In the case select the Post Completion milestone on the workflow.
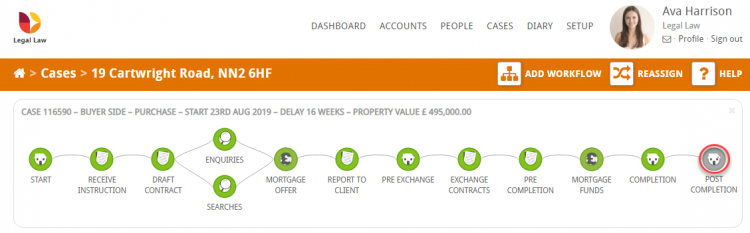
Inside the milestone click the button across the top of the screen – ELECTRONIC DOCUMENT REGISTRATION (E-DRS) as highlighted below – If you can not see this bar please visit this guide on how to add the bar to your Workflow
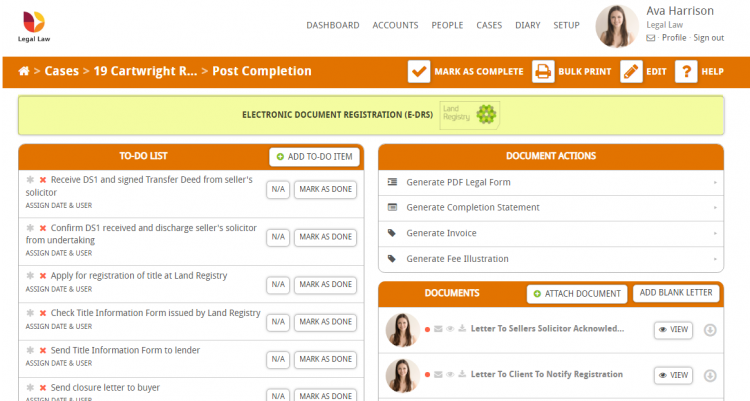
On the next screen, click the New Submission button which will start a simple process for you to complete.

Important note: you can save your submission at any point by pressing the save button

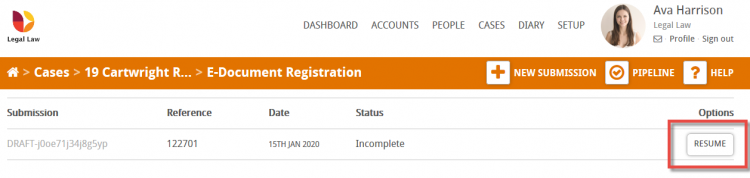
Once saved you can resume your submission any time in the case by going back into the Post Completion milestone, clicking the e-DRS button and then clicking the Resume button as shown below:
Now let’s run through the steps to prepare your submission and get it sent to the Land Registry.
Preparing and sending your submission to the Land Registry
Step 1: Application Details
(This page is the equivalent to questions 1, 2, 3 of the AP1 form)
The majority of this page will be generated for you from the information within the case. Mandatory fields are indicated with a *
Fill in any parts that have not been automatically completed and then click the Next button

Step 2: Applications
(This Page is equivalent to question 4 of the AP1 form)
In the Add New Application box on the left use the dropdown to select an application you wish to add to your submission and press the ADD+ button. You will see that the application is added to the right.
Below this dropdown you will find a number of common scenarios which, when clicked, will automatically add the relevant applications to your submission on the right, saving you time.

In this example we’ve clicked Transfer & Charge on the left and those applications have been automatically added to the right-hand side.
We can use the options buttons on the right to change the priority order, or remove an application.
When you have all the applications you wish to submit click the Next button to proceed.
Step 3: Application Values
(This Page is equivalent to question 4 of the AP1 form)
In this section we need to provide a little more information for each of the applications we added in step 2.
- Value (£) * This is the Property value, which will be pulled in automatically from the case; be sure to check it’s correct.
- Fee (£) * This is the fee that you will be charged by the Land Registry for this application. You can use the options on the right to help you fill this in:
- ‘Fill with £0’ – click this to add £0 (used if there is no fee for this application)
- ‘Fill from Quote (£value)’ – click this to pull through the Land Registry fee from the quote attached to the case
- ‘Double check them against the Land Registry Fees calculator’ – click to load up the HM Land Registry fee calculator.
- Certified Copy Type * – be sure to select if it is an original, certified or scanned.
If you are entering a charge you will also need to include the Charge Date.
An MD Reference can also be entered.
Click the Next button to proceed.

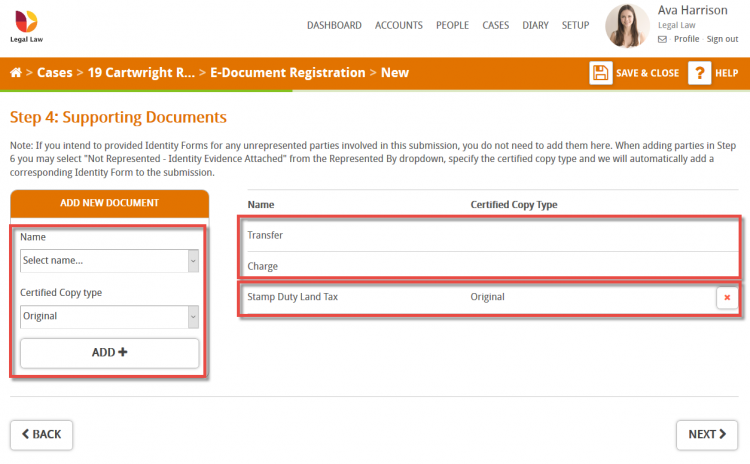
Step 4: Supporting Documents
(This Page is equivalent to question 5 of the AP1 form)
In the Add New Document box on the left use the dropdowns to select the Name of a supporting document you wish to include in your submission. Select the Certified Copy Type and press the ADD+ button. The supporting document will be added to the right.
Important Note: Any applications added in step 3 will automatically appear on the right-hand side and don’t require adding again.
Ensure you add all the supporting documents you wish to provide with your application in this step. In the example below you can see the Transfer and Charge have been automatically added from step 2 and we have also added the Stamp Duty Land Tax form.
Note: If you submit your SDLT through Hoowla, the Stamp Duty Land Tax form will be automatically placed in this section to save you time (to learn how to submit SDLT though Hoowla click here).
Click the Next button to proceed.
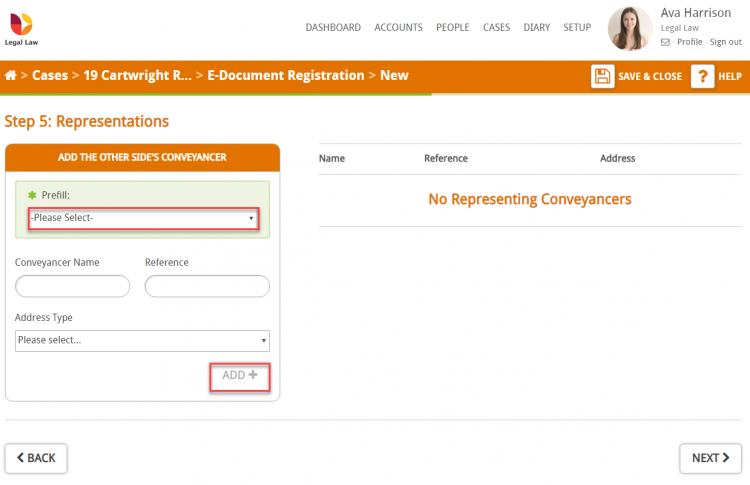
Step 5: Representations
This section allows you to add the details of any other conveyancers involved in the transaction.
Hoowla will use the other side solicitor that has been saved in PEOPLE INVOLVED in the case to pre-fill this section.
Please note: It is important that your team add all the correct details to PEOPLE INVOLVED when setting up the case as this will save you time through the entirety of the case. Here is a guide on assigning people roles in People Involved.

If you need to manually add the other side’s conveyancer, use the Add the Other Side’s Conveyancer box on the left. Use the pre-fill dropdown to add details from PEOPLE INVOLVED in the case or manually enter in their details. Press the ADD+ button and the conveyancer will be added to the right hand side.
Click the Next button to proceed.
Step 6: Parties
(This Page is equivalent to questions 6, 7, 9, 10, 13 of the AP1 form)
This step is where each party involved in the transaction is added.
Please note: Hoowla will use People and Company records that have been saved in PEOPLE INVOLVED in the case to pre-fill this section. It is important that your team add all the correct details to PEOPLE INVOLVED when setting up the case as this will save you time through the entirety of the case. Here is a guide on assigning people roles in People Involved.
In the example below we can see that our client and the lender have been added on the right.
There is a warning in red above to let us know that the transferor for the transfer application is yet to be added.

In this example let’s add the transferor to the submission to resolve the warning above.
Use the Add Party box on the left to manually add people/companies to your submission. Use the Pre-fill box to select people/companies already in your case to add; you are able to amend their details if needed. We’ve selected that the person John Smith is an individual and ensured his full name entered is correct.
In the roles section for each application ensure you tick the relevant boxes that apply to the person/company you’re adding. John Smith is the transferor so we’ve ticked transferor in the transfer application (which is highlighted red to indicate that it needs doing).
Towards the bottom we need to select who John Smith is being represented by (the other sides conveyancer, Jen James LLP).
All that’s left is for us to press ADD+ to add John Smith to the submission on the right.
![]()
In the image below we can now see John Smith has been added to the submission and all of the requirements for each application have been satisfied.
Click the Next button to proceed.
![]()
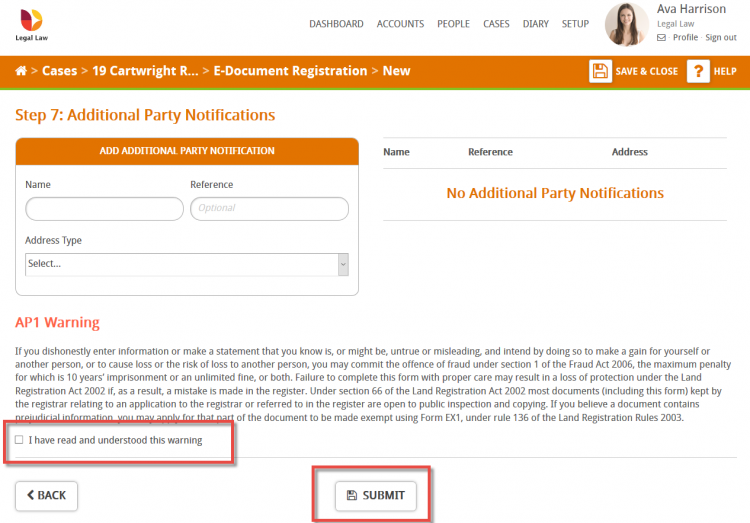
Step 7: Additional Party Notifications
(This Page is equivalent to question 8 of the AP1 form)
This is the final step in the process. Use this page to add any additional party notifications.
The final step is to acknowledge that you have read and understood the AP1 warning by ticking the box.
Press Submit to send all of the details to the Land Registry.
Uploading all your supporting documents
Once your submission has been sent to the Land Registry we need to upload all of the supporting documents.
We need to click on the Attach Document dropdown to select documents which have been uploaded to the case. Clicking the Submit button will upload that document to Land Registry submission. There is an indicator in the top right to let you know how many documents still require uploading.
Please note: You must ensure you supply every document otherwise it will result in the Land Registry raising a requisition.
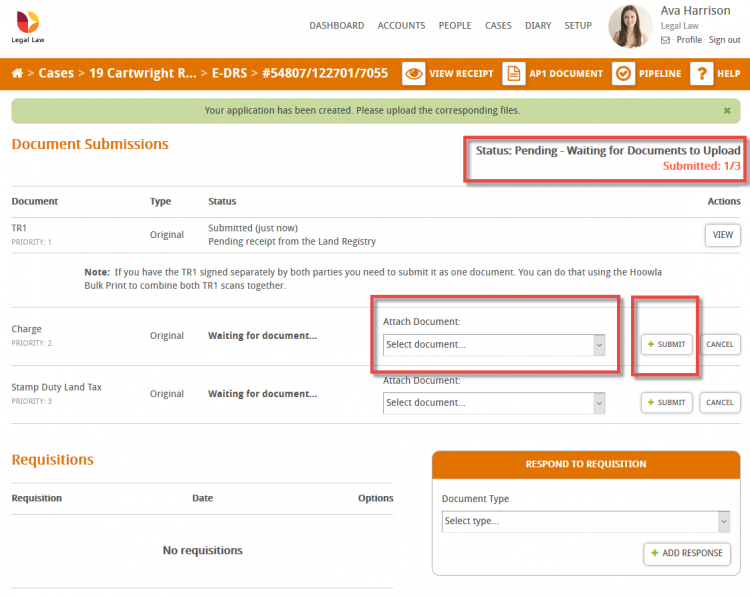
Use the buttons in the bar at the top to view the Land Registry receipt, AP1 document and access your submissions pipeline, which lists all of the submissions you’ve made and their status.
